Top Mods done to my Virago 250:

Top Ten mods done to my Virago 250:

1)  Sprocket change to 17/38. Sprocket change for Virago 250  http://wp.me/p1LWaM-13

2)  Weight Reduction The weight of my bike now with a full tank is about 129 kg or 284 lbs.
I have reduced the bike’s weight by about 18 kg or 40 lbs. This reduces the 0-to-60 mph time from 10.8 seconds to 10.2 seconds.  http://wp.me/s1LWaM-test

3) Front Fork mods –  http://wp.me/p1LWaM-6l Low Cost Front Fork mods – Yamaha Virago 250 – the stock forks may be better than you think
· Fork Oil, changing – Virago 250
· Front Forks, adding 1.625 inch spacer – Virago 250
· Front Forks, torque values – Virago 250
· Fork Brace, measurements to use to find a universal fork brace – Virago 250
· Front Fender, removing – Virago 250 – bad idea to remove – it functions as a light duty fork brace
· Rear fender mounting, two large allen bolts, affects handling, torque value is 43 ft lbs (60 Nm) – Virago 250
· Swing arm pivot bolt, affects handling, torque value is 33 ft lbs (46 Nm) – Virago 250
· Front Forks, springs have two stages – first 1.3 inches is softer – Virago 250

4) Removing chrome head covers on Virago 250 http://wp.me/P1LWaM-jp (top of post, item #5)

5)  Improve seating position – add low bars, move seat up 2″, move pegs back 12″

6)  Partially expose front sprocket by removing lower part of front sprocket cover.

Advantages of this mod:
1) You can remove the front sprocket or chain without having to remove the front sprocket cover.
2) You can polish the front sprocket and you can keep that area clean. On the bikes that I have owned, that area always has lots of dirt and grease.
3) You get the  more mechanical “look” of having an exposed front sprocket, but with some safety since the top part is retained.

delete L side plastic cover, polish + waterproof volt reg, expose front sprocket by removing lower part of cover-p-c

I do not recommend this mod as it reduces safety. (If you do it anyway, make sure your chain is in excellent condition and you always wear boots when you ride.)

7) Exposed Voltage Regulator mod for Virago 250 – The “delete left side plastic cover and expose voltage regulator mod.”  http://wp.me/P1LWaM-mX  (bottom of post)

The voltage regulator runs too hot on some Virago 250s.  Basically, mine stays cool if the bike is moving, but gets too hot in stop-and-go traffic or idling.

8) Polished engine and other parts.  http://wp.me/p1LWaM-6w   

————————————

17/38 sprockets made my Virago 250 faster – higher gearing is not always slower

I just changed (from 17/40) to 17/38 sprockets and drove it to work today with 17/38 for the first time.

As expected, it ”moves up” the speed range for each gear.  If you used to go 35 to 50 mph in 4th gear, for example, now you would go 40 to 55 mph.  A lot of my commute is 50 mph and hilly, so I was in 4th gear a lot where I used to be in 5th gear.  Fourth gear is more comfortable than before at 50 to 55 mph – 5th gear is less comfortable at 50 to 55 mph.  Fifth does not climb hills as easily as before.

So basically with 17/38 you stay in lower gears than before and use 5th more for highway use.

In my opinion,  17/38 is the proper stock setup, and 17/40 is good if your carry a passenger, have heavy accessories, or your engine is not running at it’s best.

Sunstar[divider]   steel 38T Virago 250 rear sprocket $31.46 shipped step 1 (lumin wild) - Copy--

Not expected – Here is what I found out that I did not expect:

17/38 makes the Virago 250 slower faster

It would be easy to think that higher gearing (17/38) would result in slower acceleration – it does not, since you are usually in a lower gear. Since I was driving in lower gears, the bike felt like it had more acceleration today – it felt like it had more horsepower. I was driving in lower gears than normal, revving the engine more, and driving harder than normal.  I got 71.7 mpg the first day (includes some test rides) and 77.2 mpg the second day (my recent average was 79.1 mpg)

1 HEADER step 8 - vincent

.
.

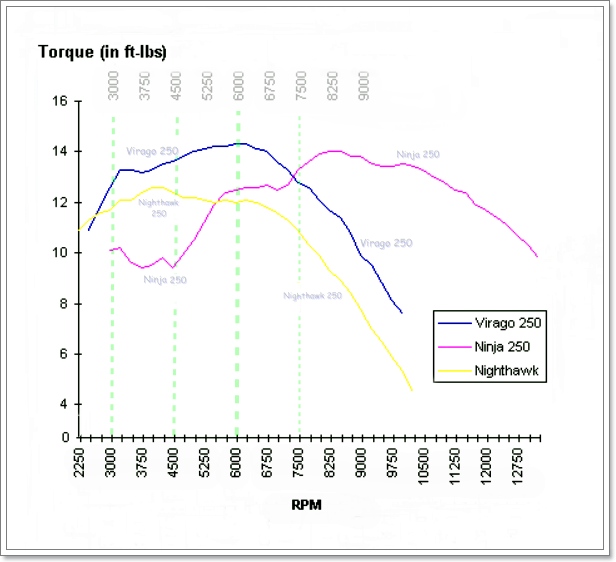
With 17/38 sprockets, 5th gear on the Virago 250 is most usable above 60 mph.

Torque Curve chart - Virago 250 (stp12)

Miles per hour
The Virago 250 greatest torque (between 4500 and 6200 rpm) is this road speed (indicated) in 5th gear:
17/38/130/stock front tire         59 to 81.1 mph

17/38/130/larger front tire         56.4 to 77.6  mph

17/38/140/stock front tire         60.9 to 83.7 mph

17/38/140/larger front tire         58.3 to 80.1 mph

Kilometres per hour
The Virago 250 greatest torque (between 4500 and 6200 rpm) is this road speed (indicated) in 5th gear:
17/38/130/stock front tire         95 to 130.5 kph

17/38/130/larger front tire         90.8 to 124.9 kph

17/38/140/stock front tire         98 to 134.7 kph

17/38/140/larger front tire         93.8 to 128.9 kph

    [stock front tire  3.00×18     —    “larger” front tire   100/90-18]   

1 HEADER step11 royal_enfield    _v-twin_exhaust

.
.

That ↑ was the good news.

Now here is the bad news.

17/38 works so well because you can be in a lower gear – except over 65 to 70 – when you are in top gear.  Fifth gear does not climb hills as easily as before and strong headwinds affect the bike more – this is expected, but is still a downside of 17/38 – “less power” over 65 to 70 mph (because you can be only in 5th gear).

Fifth gear with 17/40 is a little stronger that 17/38.  A six-speed transmission would be cool – on the highway, you could choose to travel in either 5th or 6th gear – depending on the wind, hills, and other conditions.

For me, with 17/38 I have  more power less than 65 mph (because I can be in a lower gear) and  less power over 65 mph (5th gear).

The Virago 250 is still very good on the highway for a 250cc bike – and it has a great midrange torque for  a 250.

  Update August 5, 2013 – This morning there was a strong headwind coming to work.  Now that I have a 38 tooth rear sprocket, in 5th gear, it was bogging – reminding me of my CB160.  When I got to work, I kept thinking that I should have gotten a 39 tooth rear sprocket instead…………..

——————-

Virago 250 rear sprocket data

Posted in Motorcycles | Tagged , , , , , | 7 Comments

Out of gas – but now I know how far I can go on reserve

I95 southern CT--

Today I let my Virago 250 run out of gas on purpose.
I carried some spare fuel so I could do this.
If you were on I-95N in Norwalk, CT, (in bumper to bumper traffic) about 5:00 PM today – yes, that was me.

Virago 250 gas tank - Les S (cartnpic2)

If you refill to a level about one
inch from the top, the usable capacity
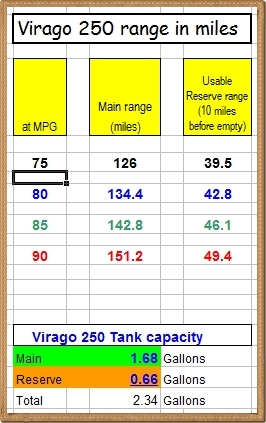
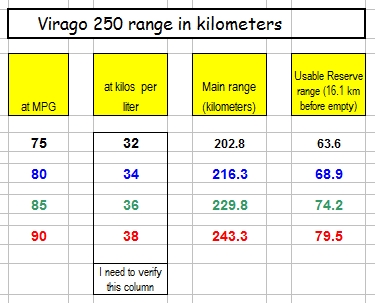
of the Virago 250 tank is 2.34 gallons.

Tank capacity   2.34 gallons total
1.68 gallons Main         .66 gallons Reserve

I do not always fill the tank that high – so keep in mind that if you don’t fill to about an inch from the top, it won’t hold as much.  For example, your usable capacity might be 2.2 gallons.

Virago 250 range in miles (chart2 - paper01 border)

Virago 250 range in kilometers

Posted in Motorcycles | Tagged , , , | 5 Comments

Virago 250 speeds-in-gears charts 17/38 and 17/40

  See end of post for  paper tachometer overlay  you can print out and put on your Virago 250 speedometer.

I was driving to work this morning and I just happened to notice that my exhaust note was an “E” pitch at an indicated 50 mph in 4th gear.

The “E” is 82.407 Hz; multiplied by 60 equals 4,944.42 rpm.
(Hertz multiplied by 60 equals rpm.)

Using this information, I made new Virago 250 speeds-in-gears charts.

(Speeds-in-gears charts already exist for the Virago 250, but I did not know if these charts were corrected for speedometer error.  My 2002 Virago 250 speedometer is 6.8% optimistist, and these charts reflect that.)

XV250 speeds in gears - 17 Front - 38 Rear

———————

XV250 speeds in gears - 17 Front - 40 Rear

——————-

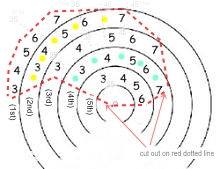
Once you have the above chart for your sprocket combination, it is easy to “make your own tach” by carefully sticking tiny numbers on the face of your speedometer.  You can fit gears 3 and 4 below the mph area, gears 1 and 2 above the mph area (on the left side of the chrome trim ring) and gear 5 above the mph area (on the right side of the chrome trim ring).  Having the 5 gears in three different sections of the speedometer make it easier to follow, as opposed to have all 5 together.  You need only numbers 4 and 6 (for 4,000 rpm and 6,000 rpm) and then you can just put in dots for the 3, 5, and 7.  How does it work?  I don’t know yet – it rained today……  (edit – it rained tomorrow, too).

Two methodsindividual numbers, or an overlay. You can stick-on individual numbers, or you can add an overlay – see below.  The individual numbers are probably better if your vision is not so great.  The overlay is not as easy to read, but if your vision is really good, you might like it.  The overlay would be better is the numbers were bigger and if you put it inside the speedometer – that way, it would not hide the speedometer needle and it would be out of the elements.

My theme for this bike is “low-budget functional” – so I could not buy a tach.  I try to make parts whenever I can.  Sometimes my experiments work out and sometimes they don’t.  If it does work out, I might take the speedometer apart and put the tiny numbers on the actual faceplate.  This would be easier to do and easier to read – since now I am putting the numbers on the glass, which is maybe 10 mm above the faceplate so with different viewing angles, you get slightly different results.  (The term is “parallax error” – I just try to avoid using big words.  When I lived in Kentucky, I got a job at an electronics store, and Tim and Mark made me sell cameras instead of the “fun” stuff – that is where I learned that.)

Most people would just buy a tach if they wanted one – this idea is for someone who is short on funds.  It is easy to read (once you get used to it) and is accurate.

XV250 speedometer marked for rpm

XV250 speedometer marked for rpm

—————

white tach face for xv250 speedo 17-40 stock front tire (step8-220x192)

(Oh, I did not know about gauge overlays until a few minutes ago…..)
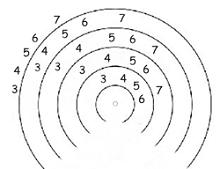
Here are two overlays for the Virago 250 speedometer for 17/40 sprockets and stock front tire.  The outside numbers are 1st gear rpm.  The innermost numbers are 5th gear rpm.
I have to print it from “Paint” to get the right size – the printed area should measure 2 1/16 inches or 53 mm wide.

(same scale as above jpg)

(same scale as above jpg)

Cut off the blank areas so all that all that is left is mostly the numbers.
Yellow highlight the 2nd gear range.  Green highlight the 4th gear range (don’t cover up the numbers).  At this point, it will look something like this:
white-tach-face-for-xv250-speedo-17-40-stock-front-tire-step8-220x192-- --
If you tape it on the glass of your speedo in just the right position for your sprocket combination, it will be accurate.  For example, for 17/40, position it so that 5,000 rpm in 3rd gear lines up with 40 mph  (17/38 would be 42 mph).  After I use it a while, I will post a more accurate one, but this one is fairly accurate.

(If your friends laugh at it, tell them the no-cost paper tachometer is more accurate than the bike’s speedometer.)

———

  edit 6/13/13 – The idea above ↑   is for someone who is short on funds or just wants to have a tach’s function without paying for it.  Of course, a real tachometer – a round one –  would be better…..

Bobster’s Virago 250 with tach

Bobster’s Virago 250 with tach

Posted in Motorcycles | Tagged , , , , , , , , , , | 2 Comments

First ride of the year

2002 Yamaha Virago 250 - Les S.

2002 Yamaha Virago 250 – Les S.

09 March 2013 – First ride of the year

• Today I went for my first ride in a few months.

38 inches of snow - the two big lumps are cars (09 Feb 2013 blizzard Stratford CT)

38 inches of snow – the two big lumps are cars (09 Feb 2013 blizzard Stratford CT)

I live in the northeastern US – we got 38 inches of
snow a few weeks ago – so I am really ready for spring.
It started right up!  I have been cranking it every
month or two, but I was still impressed.  I have
to remind myself not to bother to pull the plugs or touch the carb this year.  I added a thermometer last year  – a cool thing to have on a bike – and it read  56° or 57° on the ride.  I have a carb heater indicator light and the carb heaters were “on” the whole time.

Virago 250 - rear carb heater wire is marked red-purple - front carb heater is red-yellow

Virago 250 – rear carb heater wire is marked red-purple – front carb heater is red-yellow

The Virago 250 carb heater  sensor functions like a simple on-off switch and is set to turn “ON”at about  52° F or 11.1 C  and “OFF” at 58° F  or  14.4°C.  So at  52°F and below  the carb heaters are “on”   – and at  53° F (11.7°C) or higher  they are “off”. My bike has two carb heaters – combined they use about 50 watts – my voltage meter drops from 13.3 volts to 12.8 volts when the carb heaters are “on”.

 • I just put on a smaller tire, but I do not think I could tell a difference on this first ride. With the 130 tire, the bike should be faster due to the 4.5 lbs less weight, 3% lower gear ratio, plus the weight is  rotating weight – which is the most beneficial weight-reduction thing you can do.  It felt solid – I think some people are hyped by a larger tire (I was) and they believe that it gives a better, safer ride, but I am not sure – the 140 has maybe a 13mm [1/2 inch] wider footprint, but the load weight per inch would be lower, so you might not necessarily get a better, safer ride.  This might not be a valid comparison, but sometimes when you go from a narrow tire to a wider tire, on muddy roads the wider tire actually makes things worse, because the skinnier tire gets more weight per inch.

130/90-15 Kenda on Virago 250 wheel

130/90-15 Kenda on Virago 250 wheel

• The ride felt  “just like old times” – maybe I felt “safe” because I drove it a lot of miles last year.  Sometimes when I ride a bike for the first time after a long winter, it feels a little strange.
.
•  For a test ride, I usually turn around at the commuter lot before Rt 15.  But when I got there, I just kept right on going.  I kept heading north on Rt 110 until I got to Shelton, then I turned around.  That’s what happens, when you ride a motorcycle……

—————————————————-
—————————————————
• Before I got this bike, I wondered if the 250 would be too slow for me.  The weird thing is, about  95% of the time, the Virago 250 never feels slow or underpowered to me.  Maybe because of the good mid-range torque, or maybe because the engine is so responsive, or maybe because I subconsciously (unconsciously?) cut it a little slack for being only 250cc.  I am  almost never at full throttle, and it always seems like I am just an  easy twist away  from speeding.  On my CB160 at age 16, I had it wide open all the time.  I am a lot heavier now, so my Virago 250 is only about 10% faster than my CB160 was.

Big Bike vs. Little Bike – opinion.   Here is my opinion on the big bike vs. little bike question.

Safer – lower top speeds
1).. Little bikes are safer than big bikes in that they won’t do the really high top speeds, which is dangerous.

Less safe – stability
2).. Little bikes are more dangerous than big bikes when you compare the stability of most larger bikes.

More challenging to drive – less acceleration
3).. Little bikes are more challenging than big bikes to drive because you don’t have a lot of power to get you out of situations – you have to plan ahead when wanting to pass someone. (In the olden days I drove 36hp and 40hp Volkswagens, so I had to learn about planning ahead and building up speed and using your momentum when you want to pass another car.)

Virago 250 power:  challenging but not frustrating
4).. The low power of the Virago 250 is challenging, but not low enough to be frustrating – it does 0-60 in 10.5 to 11 seconds, so it is about as fast as the average car – so if you are driving aggressively, and the person in the car is not, you can usually out-accelerate them.

Virago 250 power:  not under-powered enough to be dangerous
5).. The low power makes it more challenging to drive, but not more frustrating, and not more dangerous – 11 seconds 0-60 does not make a vehicle more dangerous, and 100 hp does not make a motorcycle safer.  Some people use the “powerful bike is safer” as an excuse to get a big bike, but in my opinion, it is not a valid argument.  I am guilty, too – and I have to use that excuse when/if I get a different bike in 3 ½ years ….

Posted in Motorcycles | Tagged , , , , , | 1 Comment

TOP TEN TIPS FOR 2013 (for Virago 250 motorcycles)

TOP TEN TIPS FOR 2013  (for Virago 250 motorcycles)

(important stuff I learned in 2012 – not just  “paint your master link white”  tips – some of these could save your life.)

1)  The magic reflective vest – about $7 or $8.

In March of 2012, I got an orange reflective vest for $6.39.  I had no idea what I was getting into.  Immediately, people starting giving me more respect.  For the most part, people stopped pulling out in front of me and also stopped tail-gating.  I have seen many drivers start to change lanes, and then they see me and do not make the lane change.  You should consider wearing a light-colored vest (yellow, orange, or green) when you ride a motorcycle.

reflective vest - it's magic           motorcycle_reflective           ????????

I do a few more things that can make drivers notice me better:  I wear a white helmet, and I have a white front license plate (black letters) and two front auxiliary driving lights (white, but yellow is better).

Two very important ways to avoid collisions on a bike is to increase your following distance and wear a reflective vest.

Get a vest – you will be amazed – and your spouse/significant other will rest a little easier when you are out on the bike………

2)  The weak rear brake on the Virago 250 is actually a safety feature  (“poor man’s ABS”).  I have never locked up the rear brake on the XV250, but on my other bike I have locked up the rear brake (and sliding/fishtailing) several times in emergency stops on I95.  In most motorcycle accidents, the front brake is applied too lightly and the rear brake is applied too hard.   If you have a Virago 250, practice using the front brake more effectively.

3)  On low-powered bikes like the Virago 250,  weight reduction makes a big difference in increased performance  (improved acceleration and reduce stopping distances), especially with wheels and tires which reduce rotating weight and unsprung weight.
I took some seats out of my car this year (weight 90 lbs – I noticed a huge difference in low speed acceleration and hill-climbing ability), and my wife had to yell at me for a month until I put them back in.
Please see this posting:     http://wp.me/p1LWaM-sy    “Make your Virago 250 faster – take off the weight”

4)  Blind spot flashers – aimed forward and to the sides – at about a 45° angle – I believe that they help prevent cars from pulling into your lane when you are in their blind spot and they can’t see you.  They can be used two different ways –
a) leave them “on” continuously when in heavy traffic, or
b) turn them on for only a few seconds when you see a car looking to go into your lane, and then immediately turn them off.

blind spot flashers face forward at a 45 degree angle---

5)  It is  easy to grease wheel bearings yourself.   This works for my bike, but your bike might be different.
1)  Carefully remove the rubber grease seals with a small screwdriver.
2a) Remove wheel bearing, remove old grease, and pack bearing with new grease, OR do it the easy way –
2b) With grease seal removed, remove the old grease from the metal bearing cover. The cover has holes, so you can use the rubber grease seal to force fresh grease through these holes into the bearings.  Put fresh grease on the metal bearing cover, then carefully push the rubber grease seal to make a little hydraulic pressure which will force the grease through the holes. Do it maybe 3 or 4 times until you see grease coming out the other side.

wheel bearing and seal_                                           wheel bearings and grease seals

6)  “Partially expose front sprocket” by removing lower part of front sprocket cover.

Advantages of this mod:
1) You can remove the front sprocket or chain without having to remove the front sprocket cover.
2) You can polish the front sprocket and you can keep that area clean. On the bikes that I have owned, that area always has lots of dirt and grease.
3) You get the  more mechanical “look” of having an exposed front sprocket, but with some safety since the top part is retained.

delete L side plastic cover, polish + waterproof volt reg, expose front sprocket by removing lower part of cover-p-c

I do not recommend this mod as it reduces safety. (If you do it anyway, make sure your chain is in excellent condition and you always wear boots when you ride.)

7)  If your air filter has a foam element, use only  real air filter oil. (I used olive oil and the wind blew it all over me and the bike.) You can lose a lot of power and your air filter won’t even look dirty – so clean or replace it once a year.

air filter oil                air filter oil2

8)  The voltage regulator runs too hot  on some Virago 250’s – I measured the temperatures on mine and listed some of them below.
Basically, mine stays cool if the bike is moving, but gets too hot in stop-and-go traffic or idling.

delete L side plastic cover, polish + waterproof volt reg, expose front sprocket by removing lower part of cover-closeup persp lum crv lbl

Fahrenheit
Common reading of voltage regulator:
106° F to 109° F (at 79° F ambient – on the highway at 65 mph)

Highest reading:
125° F (when moving over 50 mph – ambient 88° F)
152° F (in stop-and-go traffic – ambient 88° F)

Lowest reading:
86° F (when moving over 50 mph – ambient 66° F)
Do not idle the Virago 250 for more than about a minute, if possible.
The voltage regulator will get too hot – idling for 3 minutes it will go up to 142 degrees F or more.

Celsius
Common reading:
41° C to 43° C  (at 26° C ambient – on the highway at 105 kph)

Highest reading:
52° C (when moving over 80 kph – ambient 31° C)
67° C (in stop-and-go traffic – ambient 31° C)

Lowest reading:
30° C (when moving over 80 kph – ambient 19° C)
Do not idle the Virago 250 for more than about a minute, if possible.
The voltage regulator will get too hot – idling for 3 minutes it will go up to 61 degrees C or more.

(I know, I know – I need to work on my math skills)

Hope you have a very good year in 2013  – Les S.

PS   Just found this today.  Rubber hood latch – it is normally used for semi trucks but it looks like it could be used for something on a motorycle.  I’m just trying to figure out for what.

Rubber Hood Latch Bungee Latch Battery Latch w Bracket & Pin


Posted in Motorcycles | Tagged , , , | Leave a comment

Texting while driving vs. motorcycles – how to improve your chances

Accidents caused by texting while driving are increasing in the US.

When you stop (like for a traffic light),
you should leave your bike in gear and
watch your mirrors so you can drive
away if the driver behind you does not stop.  Also, when you stop, leave enough room between you and the driver ahead of you, so you have room to make a fast exit.

Stock tail-lights are not bright enough for a texting driver to notice, so it is a good idea to  increase your taillights and brakelights by four to six times.

——————–

  #1 what you need so texters can see you :

More tailights and brake lights, and they should be much brighter than stock.

• One example
is this
LED light
($9.99 shipped)-
it is very bright-
brighter than most
stock tailights.
It has 3 wires,
so it is a taillight
and a brakelight.

– – – – – – – – – –

• If the look does not bother you, this four inch LED tail/brake or turn signal light can make a huge improvement in getting other drivers to see you.
This is a double-faced light;  the normal mounting in the US would be: red facing backward and yellow facing forward.
Each light has 96 LED’s – 48 face forward, 48 face backward.  It has 3 wires so it is a taillight and a brakelight OR a taillight and a turn signal.

This is a high performance light – I could remove my four tail/brake lights and replace them with just one of these.  I put two of these on  my other bike  2 1/2 years ago and they have been great – I think they even discourage tailgating.  I always thought these were “too much”  for my Virago 250, but people have been tailgating me more lately, so I am thinking about taking them off my other bike and putting them on the XV250.  I use the Virago 250 for over 95% of my highway driving so it makes sense to do this.

– – – – – – – – – –

You do not have to get these – there are many other choices – just try to  add more rear lighting  so that your taillights and brake lights are 4 to 6 times brighter than stock.

——————–

  #2 what you need so texters can see you :

• Brake light flasher.  This will flash all your
brake lights, so, for example, if you have
four brake lights, one brake light flasher
will flash all four.

A brake light flasher is fairly easy to install, even if you are new to working on bikes.

——————–

Brake Light flasher – how to install

If you have a Virago 250, the rear taillight is very tight inside, so it is much easier to mount the brake light flasher under the seat.

A)  Cut the yellow wire (it is close to the rear fender).

B)  For the side of the yellow wire that leads to the back of the bike, attach the White wire of the brake light flasher.

C)  For the side of the yellow wire that leads toward the front of the bike, attach the Red wire of the brake light flasher.

D)  The Black wire of the brake light flasher can be attached to any ground – (1) a black wire, (2) the negative side of the battery, or (3) a screw into the frame (you can drill a small hole in the frame if you want).  This small hole will be on the inside of your frame where people cannot see it – use sandpaper so that you have about a 12 mm circle of bare metal around the hole.

————
E) This step is optional – you not need to do it.  If your brake light flasher has a green loop of wire, cutting this loop will make the flashing cycle longer – it will flash an extra 5 or 6 times.

(My opinion is that I do not like this – especially since when stopping I sometimes hit the brake lever several times, so it would be flashing too much.)
——————–

  If you drilled a small hole in your frame to attach the ground wire, now would be great time to run another wire from that screw to the negative terminal on the battery.  This is the “2nd ground wire upgade” and makes a better ground contact.
——————–
——————–

As Cliff Clavin (the postman from Cheers) would say, “Here are some little-known facts” :

• Twenty-eight percent of traffic accidents occur when people talk on cellphones or send text messages while driving,

• The No.1 source of driver inattention is use of a wireless device.

• Nearly 80 percent of crashes and 65 percent of near-crashes involved some form of driver inattention within three seconds before the event.  (Year 2006)

• Sending or receiving a text takes a driver’s eyes from the road for an average of 4.6 seconds, the equivalent of driving the length of an entire football field with your eyes closed (at 55 mph).

http://www.youtube.com/watch?v=uG_v-n7CfRM&feature=player_embedded

Posted in Motorcycles | Tagged , , , , , , , , , , , , | Leave a comment

Make your Virago 250 faster – take off the weight

There are four ways to do this:

1) Do not buy accessories unless you really need them.

2) If you do buy accessories, make sure they are lightweight.

3) Take things off the bike.

4) Lose weight yourself.

Notes:
– Adding weight when improving bike’s aerodynamics is “OK”
– Things that rotate are the best items to reduce in weight.  The weight on the outer edge of things that rotate are the most important, for example – reducing tire weight is more beneficial than reducing sprocket weight.
—————————-

The constant mind-set for weight reduction
You should always consider the weight impact on anything you do to the bike. Even removing small amounts of weight is a good thing – they can add up.  The part of the front sprocket cover that I cut off weighs 2 ounces.  The left plastic cover (covers the voltage regulator) that I do not use any more weighs 3 ounces.  The metal that I trimmed off the triple tree when I was enlarging the carrying capacity weighs 1 ounce.  If this was all that I did, it would not help, but constantly keeping in mind the idea to reduce weight is what is important.  The next thing I remove might weigh a lot more than those.  I never removed the bracket for the rear brake pedal when I originally did the footpeg move – I finally removed it and it weighs 1.5 lbs (.68 kg).

The stock Virago 250 exhaust system weighs 13.6 pounds or 6.2 kg and consists of 3 parts – the front pipe/muffler assembly is 11.0 pounds or 5 kg, the rear chrome non-functional pipe is 1 pound, and the rear black functional pipe is 1.6 pounds. The mod described in the 8/31/11 posting: “The cheap Virago 250 exhaust system mod” reduces the exhaust system weight by 5.6 pounds – after the mod the exhaust system weight is 8 pounds or 3.6 kg.

On my Virago 250, I removed the passenger footpegs and mounting plates. The downside is that you can see a lot of the muffler parts that the footpeg plates cover up. But it makes that area easier to clean and reduces the bike’s weight by 4.3 lbs.

Items that I removed (and did not replace) include:
passenger seat + bracket – weight 1.6 lbs or .73 kg (I just reinstalled this to hold tail bag)
helmet lock – weight 4.8 oz
left chrome pod – weight 11.2 oz
sissybar + backrest – weight 2.9 lbs or 1.3 kg
left passenger footpeg assembly – weight 1.9 lbs
right passenger footpeg assembly – weight 2.4 lbs
chrome head covers – weight 2.56 pounds or 1.16 kg (for all 4 pieces)
mounting plate for rear brake pedal and the two 2.5″ bolts – weight 1.5 lbs

Items that I removed and replaced with lighter parts include:
front footpegs – weight 1.3 lbs or .6 kg
air filter assembly – weight 1.2 lbs + element (replaced with new air filter 9.0 oz)
replaced bars – reduced weight by about 1.5 lbs
shifter assembly – weight 3.5 lbs (replaced with shifter weighing 0.4 lbs)
I also removed the sidestand which is 1.5 lbs and I added a centerstand (4.3 lbs).
Stock Virago 250 10 amp battery replaced with  8 amp AGM battery – weight 4.3 kg vs 2.9 kg  (9.5 lbs vs 6.4 lbs).
(before this, I experimented with a 4 amp lithium battery – weight 4.3 kg vs 0.24 kg  or 9.5 lbs vs 8.4 ounces).
In the future – I want to convert my rear wheel to tubeless and replace my 140/90-15 Pirelli (17.1 lbs + tube) with a 130/90-15 Kenda Challenger (12.5 lbs) – weight reduction about 5 lbs.

I used to keep my raincoat (2.2 lbs) on the bike, but now I removed it and I bring it only when it might rain.

Other things that could be done
Remove 4.3 lb centerstand and use a 1.5 lb portable centerstand – but what I made so far is not working so good.
(I do not use side-stands.)
Replace steel 40T rear sprocket with 38T sprocket – steel or aluminum – maybe drill steel one for lightness

Racing chain (less weight) – 3.5 lbs compared to my current 0-ring chain 4.5 lbs

————
Weight watch – my 2002 Virago 250 – Les S.

The weight of my bike now with a full tank is about 129 kg or 284 lbs.
So far, I have reduced the bike’s weight by about 18 kg or 40 lbs.

This reduces the 0-to-60 mph time from 10.8 seconds to 10.2 seconds.
(Losing 20 more lbs would reduce the 0 to 60 mph time to 9.9 seconds.)
These are calculated – but I am going to time it soon.
————

Under a Virago 250…………


-Les S.

Posted in Motorcycles | Tagged , , , , | Leave a comment

Misc.

Gas mileage watch –  my 2002 Virago 250 – 17/39 sprockets – Les S.

In the month of July 2011, I went 808 miles, using 8.75 gal, for 92.4 mpg.

In the month of July 2012, I went 896 miles, using 11.07 gal, for 81.0 mpg.  (Possible cause of less mpg in 2012:  in 2011 bike was more streamlined, I did some hypermiling, tires were 32F/39R, and in 2012 I adjusted the carburetor and tires are much lower pressure than 2011.)

In the month of August 2012 so far, I went 1,053 miles, using 13.08 gal, for 80.5 mpg.

My commute is hiways and two lane roads 45 to 65 mph with some hills.  I use premium fuel 93 octane.

Motorcycle Aerodynamics –  Streamlining

update 9/12/12  Last week I was getting about 82.8 mpg.   I re-installed the passenger seat, and started back using a tail bag – both for better aerodynamics.  After doing this plus filling the tires, this week I got 85.7 mpg.

update 9/23/12   I added an enclosure behind the tail bag to improve the streamlining effect.  The enclosure (385 cubic inches) can be used for storage.  Storage capacity on the bike is now 4,385 cubic inches (2,500 fairing + 1,500 tailbag + 385 rear aero enclosure).  I have driven the bike to work once and the tailbag and rear enclosure have definitely made the bike faster.  There was one long hill I went up in 5th gear that I had never been able to use 5th before.

A lot of drag is caused by the empty space right behind the driver – adding something to fill in that space (tapered in back) can help.  Last year I had a 21 inch (533mm) highaero box and I was getting 94 mpg.

The tailbag/rear enclosure that I have now is 17 inches deep, 14 inches high, 13 inches front width, and 4.25 inches rear width.  (432mm D x 356mm H x 330 mm front width x 108 mm rear width)

If you are interested in motorcycle aerodynamics, the Virago 250 is a great bike for aerodynamic mods.  Check out the Bob Vetter site and http://ecomodder.com/forum/motorcycles-scooters.html
————

Today’s Completely Random Fact:

Car 33 mpg,    bike1  66 mpg ,   bike2  99 mpg

In October 2011, I drove 3 different vehicles to work (94 miles round trip).  In the same week I got 33.3 mpg with my car, 66.4 mpg with my 1981 Honda CM400, and 99.1 mpg with my Virago 250.

(My wife has always said “no” to me getting a moped – which is too bad, because the next interval would have been 132 mpg.)
————

Motorcycle tires can lose their air much faster than car tires.

I just checked my tires and they were low (25 psi Front / 9 psi Rear).

For better gas mileage, I normally run 32F/38R.

With a larger rear tire, you can reduce your pressure about 10% – so 32F/38R with a 130 rear tire would be about 32F/34R with a 140 rear tire.

That is one of the benefits of a larger rear tire – you can run a little lower pressure and get a softer ride.

update 8/29/12  I drove the XV250 to work today for the first time since I added air to the tires. It felt like it had about 2 more horsepower – I went up 8 or 10 hills in 5th gear that usually require 4th.
——-

The factory recommended  tire pressure is:

Up to 90 KG (198 lbs) load :

25 PSI Front / 29 PSI Rear with 130 rear tire

(approx 25F/ 26R with 140 rear tire)

Over 90 KG (198 lbs) load :

29 PSI Front / 32 PSI Rear with 130 rear tire

(approx 29F/ 29R with 140 rear tire)
————

9/13/12 – As of today, I have now gone  10,000 miles  on my 2002 Virago 250.  I have owned it for 18 months.

This is my 10th bike (my others were 160, 350, 400, 450, and 650 cc’s) and it continues to amaze me every day.

————
Inclusion
Do you wave to people on motorcycles? I do it most of time; sometimes the traffic is too heavy for me to do it. I even wave to people on scooters and mopeds – 8 out of 10 times they do not return the wave as they are not accustomed to being waved to.
————

To be continued  …………..   – Les S.

Posted in Uncategorized | Tagged , , , , , , , | Leave a comment

Voltage regulator TEMPERATURE – Virago 250 – Does yours run too hot?

Voltage regulator TEMPERATURE  – Virago 250 –  Mine stays cool if bike is moving, but gets too hot in stop-and-go traffic or idling.

I recently added a temperature gauge to my Virago 250 voltage regulator.

The voltage regulator on some Virago 250’s runs too hot – it is good to be below  120° F or 47° C.  At this temperature, it will burn you if you hold your hand on it for a few seconds.

Fahrenheit

At 79° F ambient – on the highway at 65 mph, the voltage regulator ran at 106° F to 109° F.

When I slowed down it went up to 112° F.

When it became breezier, it went down to 103° F.

At 70° F ambient – at 50 mph, it ran at 93° to 96° F.

At short red lights, it went up about 5 degrees F.

At longer red lights, it went up about 10 degrees F.

Highest reading:

– when moving over 50 mph:  125° F  (ambient 88° F)

– in stop-and-go traffic:   152° F  (ambient 88° F)

Lowest reading:

– when moving over 50 mph:  86° F (ambient 66° F)

Do not idle the Virago 250 for more than about a minute, if possible.

The voltage regulator will get too hot – idling for 3 minutes it will go up to 142 degrees F or more.

Celsius

At 26° C ambient – on the highway at 65 mph, the voltage regulator ran at 41° C to 43° C.

When I slowed down it went up to 44.4° C.

When it became breezier, it went down to 39.4° C.

At 21° C ambient – at 80 kph, it ran at 34.0° C to 35.6° C.

At short red lights, it went up about -15 degrees C.

At longer red lights, it went up about -12.2 degrees C.

Highest reading:

– when moving over 80 kph:   52° C (ambient 31° C)

– in stop-and-go traffic:    67° C  (ambient 31° C)

Lowest reading:

– when moving over 80 kph:   30° C (ambient 19° C)

Do not idle the Virago 250 for more than about a minute, if possible.

The voltage regulator will get too hot – idling for 3 minutes it will go up to 61 degrees C or more.

———————

What to do to help your Virago 250 voltage regulator run cooler:

These are just ideas at this point – I am going to try them to see if they help.

1) Attach another heat sink to the voltage regulator.  If you have an old Virago 250 regulator, try that – it should fit great – mount it underneath the regulator, base to base – you want to get as much metal to metal contact as possible.

2) Leave the left plastic sidecover off.  Use sealant on the electrical connector.

3) If you need to idle your bike for more than a minute, put a fan on it.  This will help the engine run cooler as well.

The last two only help  if the bike is moving (the voltage regulator overheating is usually not a big issue when the bike is moving)

4) Put a piece of plastic above and slightly ahead of the regulator to serve as a wind deflector to direct more airflow to the regulator.

5) Put spacers or washers under rear of regulator to angle the rear out so it will get more airflow.

———————

This will make your Virago 250 voltage regulator run hotter:

I added lower fairings to my Virago 250, and the voltage regulator ran 14% hotter (when bike is moving).

———————

Tips to help make your Virago 250 a little faster.

This is what worked for me:

1) check tires often (it can make a huge difference in performance)

2) pilot screw adjustment 3/4 to one turn out

3) removing parts for weight reduction (I have removed 40 lbs so far)

4) lost 10 lbs myself

5) O-ring or X-ring chain

6) iridium plugs

7) new, larger air filter

8) FUTURE –  I want to convert my rear wheel to tubeless and replace my 140/90-15 Pirelli (17.1 lbs + tube) with a 130/90-15 Kenda Challenger (12.5 lbs)

The factory recommended tire pressure for Virago 250 is:

25 PSI Front / 29 PSI Rear – for up to 90 KG (198 lbs) load.

29 PSI Front / 32 PSI Rear – for over 90 KG (198 lbs) load.

Posted in Uncategorized | Tagged , , , , , , | 2 Comments

Virago 250 – Do not buy chrome parts – just polish the parts that are already on the bike – original posting was updated

Please check out this posting:

Virago 250 – Do not buy chrome parts – just polish the parts that are already on the bike. Here is the link:  http://wp.me/p1LWaM-6w   

I updated it today.

———–

I am not finished polishing the right side, but I decided to work on the left side anyway.  What I am doing:

· I have started polishing the left engine cover.  I only hand-polish, so it will take about eight hours – a lot less if I do the paint sanding step with the engine hot.

·  The “delete left side plastic cover and expose regulator mod.”  I removed the left side plastic cover,  and polished and waterproofed the voltage regulator.  I will be leaving the cover off permanently – I like the looks of the voltage regulator, even though the cooling fins orientation does not match the engine.  On some Virago 250’s, the voltage regulator runs too hot –  I do not think that mine has that problem but being in the open air should help a little to keep it cooler.

 · I do not recommend this mod:  partially expose front sprocket by removing lower part of front sprocket cover.  This mod reduces safety so I do not recommend it.  (If you do it anyway, make sure your chain is in excellent condition and you always wear boots when you ride.)  What I like about this mod is that you can polish the front sprocket and you can keep that area clean.  On the bikes that I have owned, that area always has lots of dirt and grease.
———–
———–

Virago 250 – changes for 2013

  I think this is all the changes for 2013 – if I find any more I will add to this post …

1) New handlebar design consists of a flat bar with chromed risers.  Yamaha claims that this new handlebar improves the riding position, rider comfort, and styling.

2) 60/55-watt, Xenon headlight

3) 2013 color is  Deep Blue

2013 Yamaha V-Star 250 US MSRP Price:  $4,290  USD

(for the 2012 model, the color was Raven (black) and the US MSRP was $4,190 USD )

———–
———–

Today’s random thought –
Always expect the unexpected.
The object that is about to hit you, you probably do not see it yet.

Posted in Motorcycles | Tagged , , , , , , | 4 Comments